Install BoringTun with UFW
In this guide I will guide you to install BoringTun (an userspace implementation of WireGuard) in a system with UFW. I will use Debian 11, but it will work with most standard distros.
1. Install WireGuard
First we need to install WireGuard. For this we will use the standard package manager of our distro. In my case, I will use APT with the following command:
2. Setup WireGuard
BoringTun uses the same configuration that WireGuard, so we need to setup WireGuard as usual.
2.1. Generate keys
If the public and private key were not generated, we need to generate them with the following commands:
# Generate private key
wg genkey > /etc/wireguard/private.key

# Remove permissions for other users
chmod 0600 /etc/wireguard/private.key

# Generate public key from private key
cat /etc/wireguard/private.key | wg pubkey > /etc/wireguard/public.key
2.2. Create config file
We need to choose multiple settings for WireGuard. Those are:
- Range of IPs of our VPN: I chose 192.168.128.1/24
- Server listen port: I chose the default WireGuard port, 51820
- The name of the virtual network interface: I chose wg0
- Check which physical interface we want to route the traffic to: I chose eth0
- Whether we want to auto-save the config: I chose yes (true)
With our settings decided, we write the config file in /etc/wireguard/<interface>.conf (in my case, /etc/wireguard/wg0.conf) with the following content:
[Interface]
Address = 192.168.128.1/24
ListenPort = 51820
PrivateKey = YOUR_PRIVATE_KEY
SaveConfig = true
PostUp = ufw route allow in on wg0 out on eth0
PostUp = iptables -t nat -I POSTROUTING -o eth0 -j MASQUERADE
PreDown = ufw route delete allow in on wg0 out on eth0
PreDown = iptables -t nat -D POSTROUTING -o eth0 -j MASQUERADE
2.3. Enable forwarding
To enable forwarding, we need to edit the file /etc/sysctl.conf, and uncomment or add this line:
2.4. Creating and enabling a firewall rule
We need to create and enable a firewall rule to allow inbound connections. The way I find more maintainable is to create an application rule in UFW and enabling it. For this we create a file with path /etc/ufw/applications.d/boringtun with the following content:
3. Setup BoringTun
3.1. Install cargo
We will build BoringTun from source, and for that we will need cargo. We do it with the package manager of our distro, in my case:
3.2. Install BoringTun
Then we can install BoringTun, for that we just execute:
This will create an executable in our user's directory (in my case/root/.cargo/bin/boringtun). I personally don't like it here, so I will move it to /opt/bin, but you can do whatever you prefer, just keep in mind that I'll be using the new path.
3.3. Create and enable the systemd service
For that we just need to copy the service of wg-quick. For that we execute:
cp /lib/systemd/system/[email protected] /lib/systemd/system/[email protected]
And we modify the content of the new file to add the environment variable that will use BoringTun as the WireGuard implementation, resulting in the file containing the following data:
[Unit]
Description=BoringTun for %I
After=network-online.target nss-lookup.target
Wants=network-online.target nss-lookup.target
PartOf=wg-quick.target

[Service]
Type=oneshot
RemainAfterExit=yes
ExecStart=/usr/bin/wg-quick up %i
ExecStop=/usr/bin/wg-quick down %i
ExecReload=/bin/bash -c 'exec /usr/bin/wg syncconf %i <(exec /usr/bin/wg-quick strip %i)'
Environment=WG_ENDPOINT_RESOLUTION_RETRIES=infinity
Environment=WG_QUICK_USERSPACE_IMPLEMENTATION=/opt/bin/boringtun    # This is the line we need to add

[Install]
WantedBy=multi-user.target
Finally, we can start the service with:
systemctl enable [email protected] --now
systemctl status [email protected]
4. Setup peers
4.1. Setup client
I will use the Official WireGuard App for Android, but the settings will be the same for any client. We need to create a new connection/profile and input our settings like this:
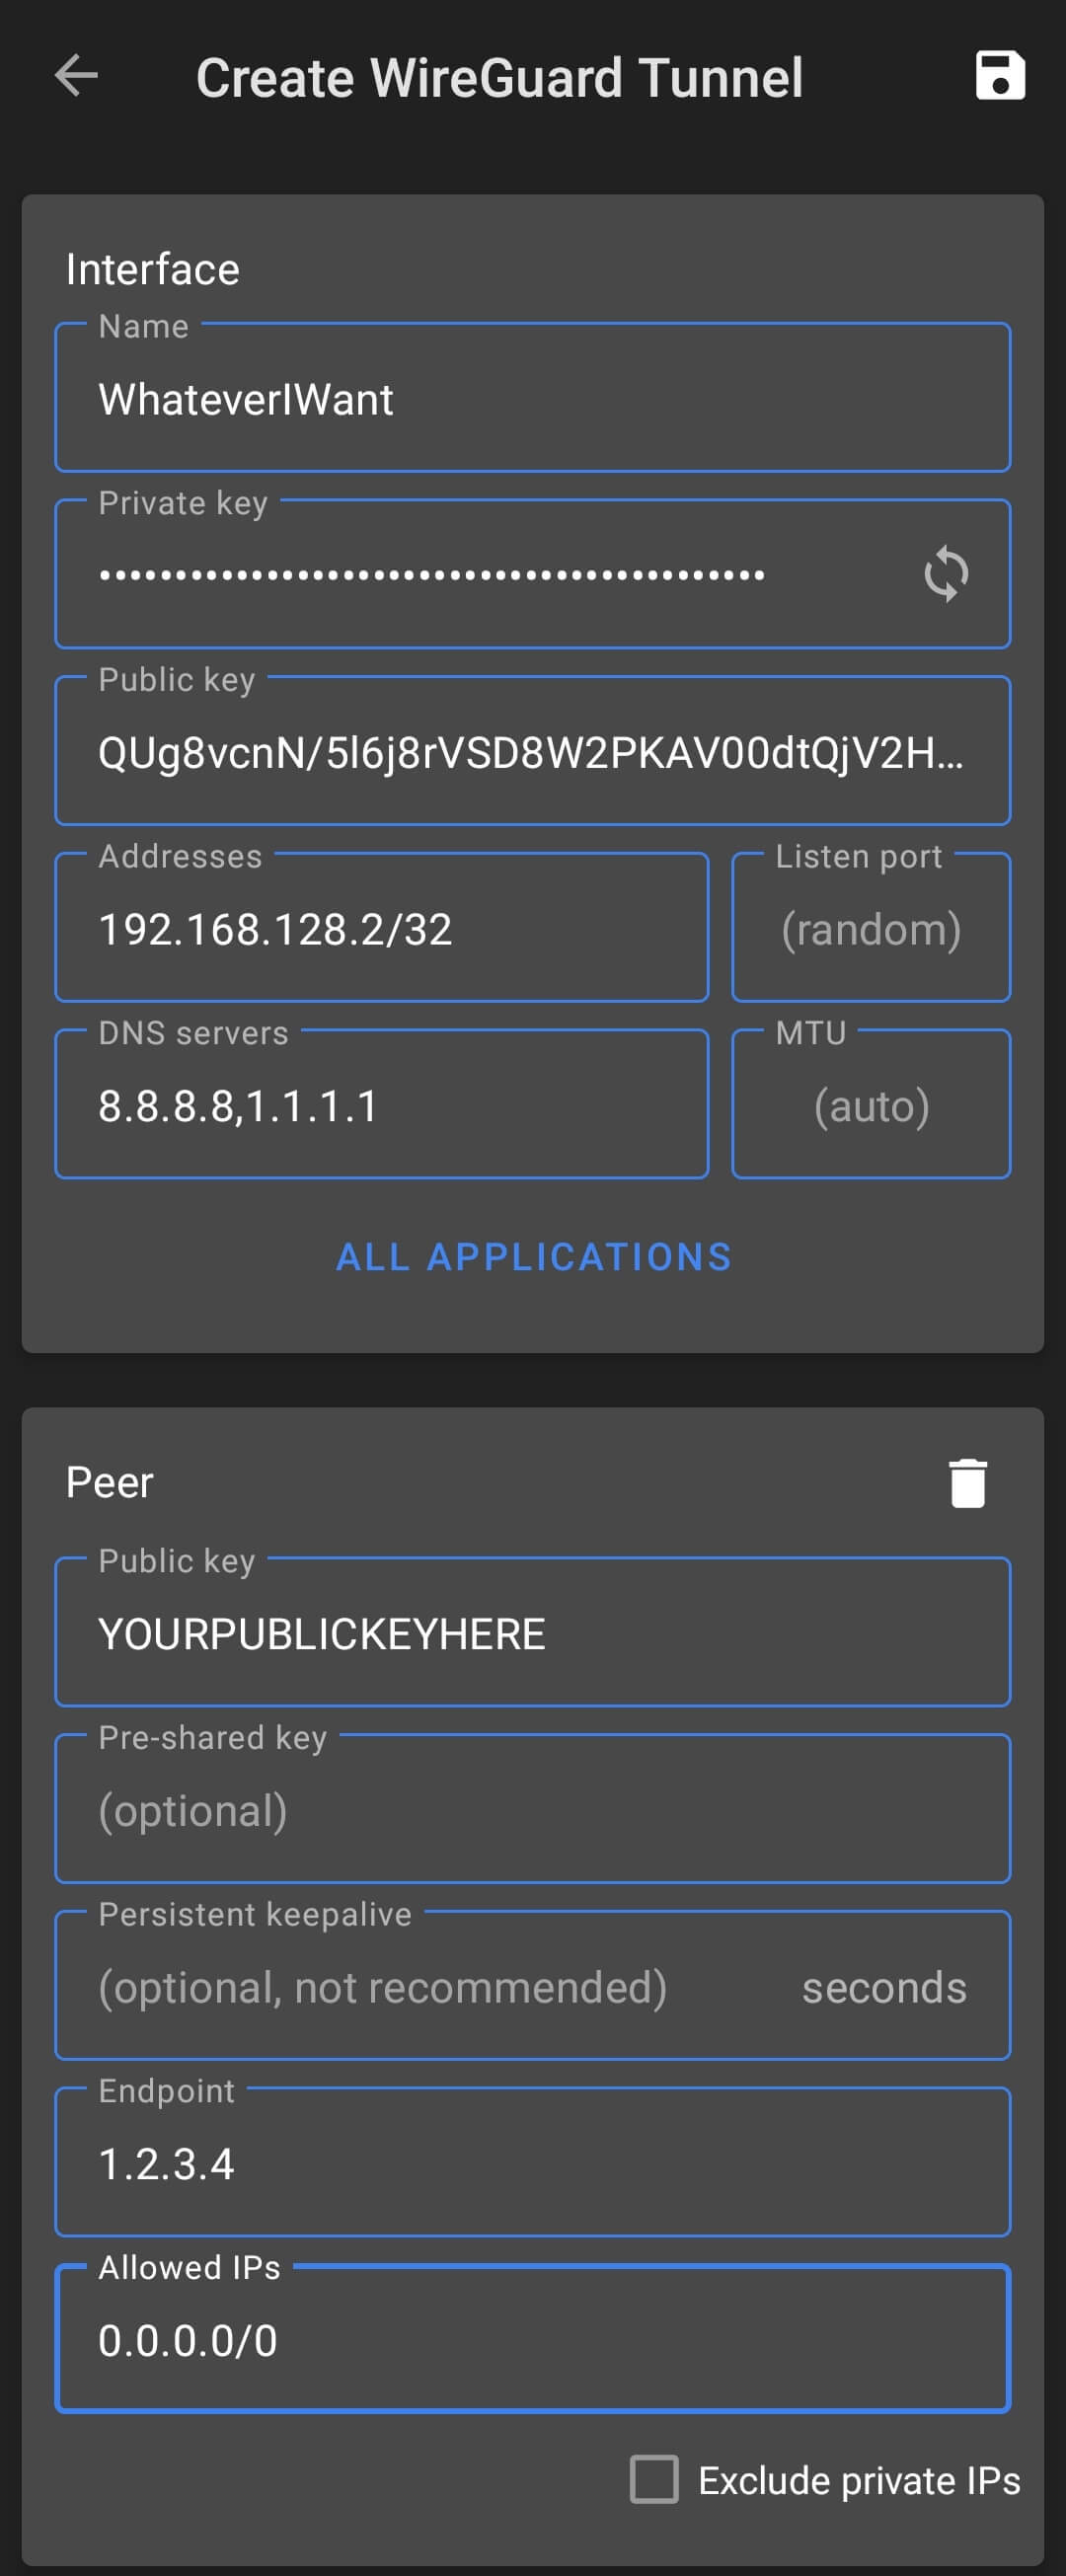
The settings means:
- Interface
- Name: The name we want to identify the profile with.
- Private key: A generated private key
- Public key: The public key associated with the private key. We will need it for the server.
- Addresses: The range of IPs we want out device to take in the virtual network.
- DNS servers: IP of the DNS servers we want to use in the virtual connection.
- Peer
- Public key: The server public key.
- Endpoint: The public address (and port) of our server.
- Allowed IPs: The range of IPs we want to route through the VPN. I chose all of them.
4.2. Setup server
We need to set up our peer in the server config. For that we need to shut it down in the first place (since we set SaveConfig=true, and that would overwrite our changes). For that we execute:
systemctl stop [email protected]
Then we edit our server config (in my case /etc/wireguard/wg0.conf) and we add an entry per each peer we want to set up. The content of the file will result in something like:
[Interface]
Address = 192.168.128.1/24
SaveConfig = true
PostUp = ufw route allow in on wg0 out on eth0
PostUp = iptables -t nat -I POSTROUTING -o eth0 -j MASQUERADE
PreDown = ufw route delete allow in on wg0 out on eth0
PreDown = iptables -t nat -D POSTROUTING -o eth0 -j MASQUERADE
ListenPort = 51820
PrivateKey = YOUR_PRIVATE_KEY

# Peer number 1
[Peer]
PublicKey = PEER1_PUBLIC_KEY
AllowedIPs = 192.168.128.2/32

# Peer number 2
[Peer]
PublicKey = PEER2_PUBLIC_KEY
AllowedIPs = 192.168.128.3/32
Then we start the service again with the following command:
systemctl start [email protected]
And we should be able to connect to the server!